Drop 2 Inches Fast With These 4 Simple Moves

We all want to look and feel our best, but finding time for complex workouts can be challenging. As a Balanced Body Educator and Certified Personal Trainer with multiple certifications, including NCPT, PMA, ACE, and AFAA, I've worked with countless clients who struggle with their midsection. The good news? You don't need fancy equipment or hours at the gym to see results. These four simple exercises can help you trim your waistline and strengthen your core. Read on to discover how to incorporate these moves into your routine for maximum results.
The Truth About Losing Belly Fat
First – I'm not a big fan of encouraging clients to reduce their waistline. You can't burn fat and "spot-reduce" in just one area. Instead, we want to encourage overall fat loss and whole-body movements using body weight, as this requires multiple muscle groups to engage and work, which increases overall calorie burn. If clients focus on doing high repetition abdominal exercises, thinking that they will be able to spot reduce, this can lead to discomfort and injury. Overworking the abdominals (core) can lead to incorrect execution of the exercises and overload on the lower back and surrounding areas. The other issues with spot reducing are the following:
Diet choices are poor– excessive calories, sugar, and processed foods increase weight gain.
Inconsistent exercise habits – results WILL take time, if clients are impatient, they quit before they begin to see the results from a consistent, well-rounded workout and diet regimen.
Poor posture as well as poor breathing habits – a daily routine of Pilates (10-15 mins) can help with that – here's my 'go-to' (every day!):
- Seated or standing: 10 full, deep breaths (in through nose/out through mouth-letting belly distend on the inhale, pull in and up on the exhale)
- Roll down to back (supine), knees bent, feet flat
- Head lifts to ab curls – 10x's
- Pelvic rocks (clock – 12 belly button, 6 pubic bone) – 10x's
- Bridges – roll up/down – 10x's (hold on the last one for 4 sets of marching)
- Knee sways – 5 sets (R/L), let both knees sway to the right, then left (twist thru the spine)
- Alt thigh fold to hold (extend another leg) stretch leg to the ceiling and circle ankle, switch to another side
- Roll onto your belly (prone) – rest your forehead on the back of stacked hands
- Pelvic rock (clock) – 5x's
- Alt leg lifts – hold & bend knee to take ankle and stretch thigh/front hip, switch
- Sit back to child pose, and finish seated or standing with 5 deep breaths.
Why No-Equipment Exercises Work
- Body weight exercises (no equipment) use multiple muscle groups and encourage more work overall – increasing calorie burn.
- Working multiple muscle groups helps to activate deep core muscles (i.e., transverse abdominus) which will help to draw in the abdominals.
- These exercises can be done anywhere – this will help with staying on a consistent routine.
- Body weight exercises help to improve posture, and improving posture can instantly make the waist look slimmer…just try it…slump down, bringing the shoulders forward and drop the head forward, then roll the shoulders up, back, and together behind you (opening the chest). Pull the chest forward, bring the eyes on the horizon, and draw the shoulders together. Imagine reaching from the top (crown) of your head and "lifting" the ribcage off of the pelvis – creating more room to pull in and up with your abdominals.
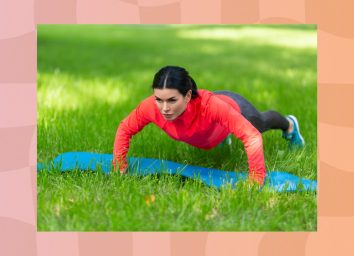
4 No-Equipment Exercises for a Slimmer Waistline
Hover w/Hip Dips
Instructions: Come to the floor on the belly and bring elbows under your shoulders, lift your hips, then straighten your legs to 'hover' off the floor (toes tucked under). Lower one hip towards the floor, then the other, and rock back and forth from right to left.
Frequency: 3 sets of 30 secs, 4-5 times per week.
Why it works: It works the obliques and helps with improving range of motion and mobility.
Beginner modification: Keep the knees on the floor.
Common mistake: Letting the belly fall towards the floor – keep the lower back long by giving the glutes a squeeze to help support the lower back.
Bicycle Twists (Criss Cross)
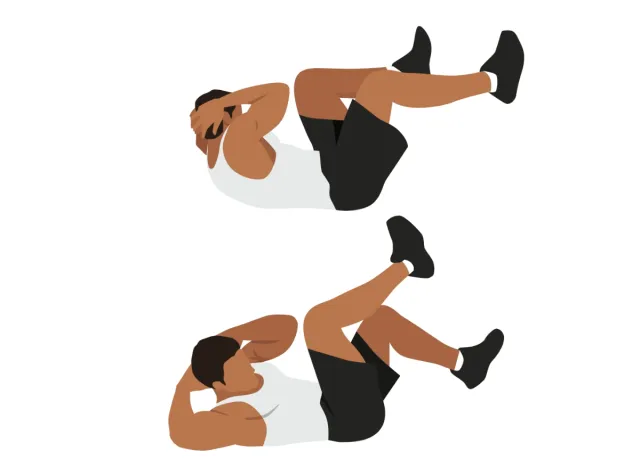
Instructions: Lie on your back with the knees bent and over the hips, hands behind the head with the elbows in the peripheral and head lifted), twist one elbow with the torso towards the opposite hip/thigh while extending the same leg just above the floor. Continue to switch right and left.
Frequency: 3 sets of 30 sets (i.e. right/left), 4-5 times per week.
Why it works: An effective exercise for targeting the core muscles (especially the obliques).
Beginner modification: Keep your feet on the floor to start. Lift one knee above the hip, twist the opposite shoulder toward that knee, return to the start, and repeat on the other side.
Common mistake: Move the arms around the head instead of twisting the torso.
RELATED: Are Your Workouts Making You Store More Fat? 6 Exercises To Avoid
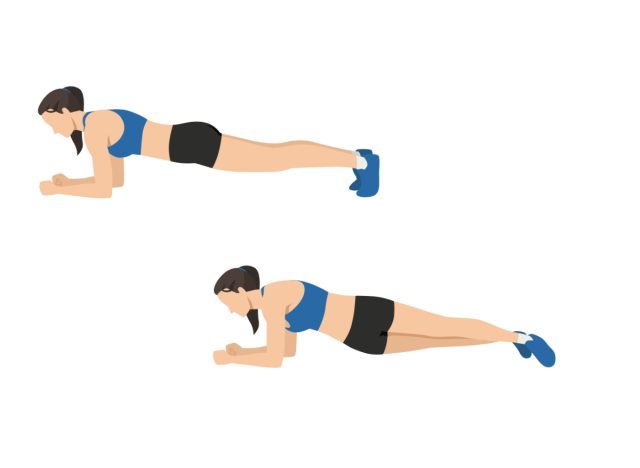
Side Planks
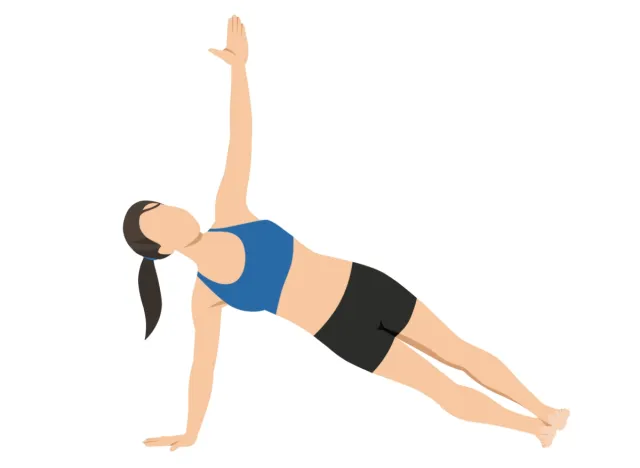
Instructions: Sit on the floor on one hip with the same arm out from the shoulder, straighten the legs, and bring the top leg slightly in front of the bottom leg with the big toe side of the foot on the floor. Lift the hips, stacking one hip on the other with the pelvis facing forward. The top foot is front and big toe side pressing into the floor, while the bottom foot is pinkie side down pressing into the floor. Squeeze the inner thighs together for support and bring the top arm to the ceiling.
Frequency: 3 sets of 30 secs on each side, 4-5 times per week.
Why it works: It helps build strong obliques.
Beginner modification: Place the bottom knee and side of the thigh on the floor for better support.
Common mistake: Letting the head drop and/or the hips 'droop' – maintain a long line from the top of the head to the heels.
Standing Twists with Knee Lifts
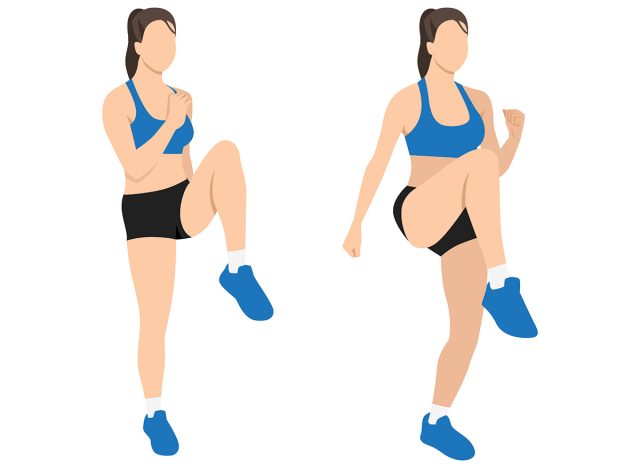
Instructions: Stand with the hands behind the head in your peripheral vision. Lift one knee and twist the opposite side towards that direction. Come back to the starting position and switch to the other side.
Frequency: 3 sets of 60 sets on each side, 4-5 times per week.
Why it works: Engages the obliques in a standing position and works on balance with the knee lift.
Beginner modification: Twist without lifting the knees.
Common mistake: Rounding the back to bring the knee up to the hip level.
How to Incorporate These Exercises Into Your Routine
Pick a time of day to do all 4 exercises and start by doing them 2 times a week and work up to 4-5 times per week.
Expected Timeline for Results
This will depend on many factors (diet and eating habits, starting weight as well as starting physical condition – i.e., the better the eating habits and health condition at start, the quicker they might see results). How to start? Do just that – start right away!
Sign up for our newsletter!