7 Daily 30-Second Moves That Shrink Stubborn Belly Fat After 40

Many people in their 40s and beyond have noticed that stubborn belly fat seems to appear out of nowhere and refuses to budge, no matter what we try. As a certified personal trainer, Level 1 CrossFit coach and wellness expert, I’ve spent years working with women in their 40s, 50s, and 60s who want to get stronger and regain confidence in their bodies. What I’ve discovered is that simple, targeted movements can make a tremendous difference when done consistently. Ready to discover how quick daily exercises can help you build strength, boost metabolism, and yes – shrink that stubborn belly fat? Let’s get started.
Why Quick, Targeted Movements Are Especially Effective After 40
This is a nuanced question. Specific exercises will not reduce fat in specific parts of your body. Putting it differently, you can’t spot reduce belly fat. However, you can build muscle in specific areas of your body and you can fire up your metabolism, both of which will contribute to overall fat reduction and, from an appearance standpoint, make specific areas of your body appear more toned – because they are.
The Science Behind Fat Loss After 40
For people over 40, the tendency to accumulate fat in our mid-sections is a real, biological challenge. It is driven, in part, by hormone changes (notably the reduction in estrogen in women) and compounded by the decrease in physical activity and other lifestyle changes that often accompany mid-life. Finally, if we don’t do the proactive work to maintain our muscle mass we will suffer from sarcopenia, which is the natural muscle loss that accompanies aging. While we can’t turn back the clock, we can reverse the effects of aging, we can build muscle at any age.
7 Daily 30-Second Moves That Shrink Stubborn Belly Fat After 40
Intervals: The Fat-Burning Powerhouse
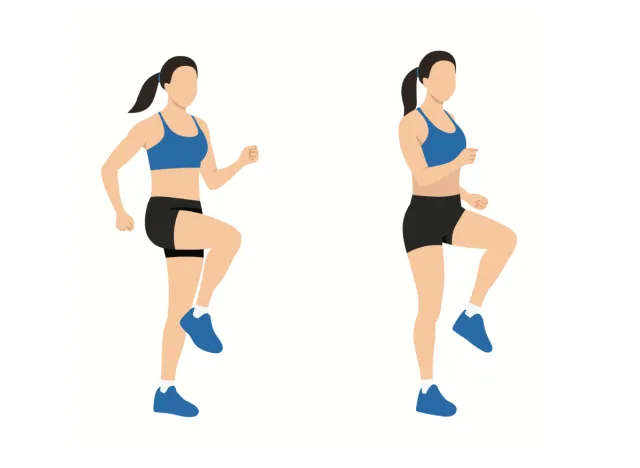
Instructions:
Intervals can be done in a vast variety of ways: remember the goal is getting your heart rate up for a short period of time, and then letting it return to baseline and repeating that process several times.
Interval training can be added to walking (where you dramatically increase your pace or find a hill to climb), running (sprint full out to the next mailbox), biking (add a sprint to your biking workout). You can also get the benefits of interval training by jumping rope (jump, rest, jump), or even with old-school calisthenics (think jumping jacks).
How often:
Two or three times a week is ideal for interval training. As your fitness improves, increase the intensity of each session.
Why it works:
Intervals are designed to fire up your entire cardiovascular system for short periods of time, followed by a recovery period to allow your system to return to normal. They have been shown to be incredibly effective at increasing caloric expenditure and improving cardiovascular fitness, which is key to ongoing fitness.
Easier version for beginners:
The easiest way to begin adding intervals to your exercise routine is walking. Pick up your pace as much as you can safely for 30 seconds, then bring it back down. Over time, you may find you are able to jog for that 30 seconds.
Mistakes to avoid:
Key to interval training is the recovery period. Don’t skimp, take the time necessary to allow your system to get back close to baseline. For most people (depending, of course, on their level of fitness), that can take about 2 minutes. Take note of this, as you get fitter, it will take less time for you to recover.
Squats: The All-In-One Lower Body Sculptor
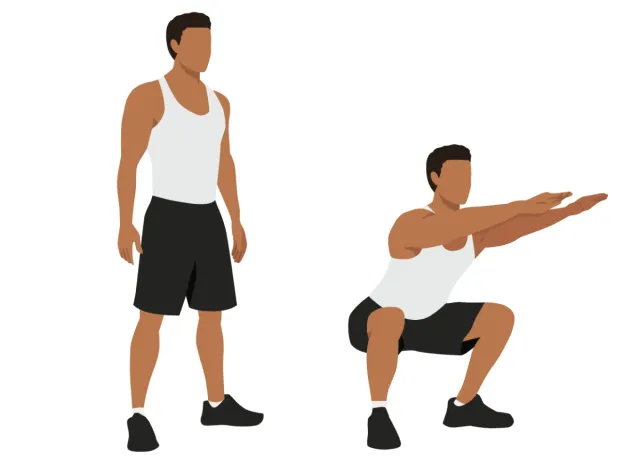
Step-by-step instructions:
- Stand with your feet shoulder width apart, toes pointed outward at a slight angle.
- Move your hips backwards (as if you are closing a car door while holding 2 bags of groceries)
- Continue hinging at the hips and bend at the knees and ankles as if you are sitting into a chair. Keep your entire foot flat on the floor.
- In a slow and controlled manner, lower yourself as far as comfortable, aiming for your thighs to be parallel to the floor, or even slightly lower.
- Rise back to standing by reversing the pattern.
How often:
This depends entirely on where you are starting. Ideally, build up to 10 reps for 3 sets.
Why it works:
Squatting is a big muscle move: It challenges our quads, glutes, hamstrings and even our core. Putting all of these big muscles to work fires up your metabolism and builds muscle, the perfect recipe for fat reduction.
Easier version for beginners:
A simple but still highly effective way to build your squat is to begin with a sit-stand-squat. Find a stable chair or bench, and stand in front of it with your feet hip-width apart. In a slow and controlled way, sit down and stand up.
If you find that too difficult when you are first getting started, you can push off from the arms of the chair and work up to where you can sit-stand without using your hands.
Common form mistakes to watch out for:
- Dropping your chest forward as you go to stand up. People often do this when they don’t have sufficient leg strength and use their upper body for momentum.
- Letting your knees come together as you stand up. Strive to keep your knees tracking over your toes, rather than caving in toward one another.
- Letting your heels come up off the floor. During the move, think about maintaining three points of contact with the floor, your heels, toes, and ball of the foot.
Rucking: Walking With Weight For Maximum Results
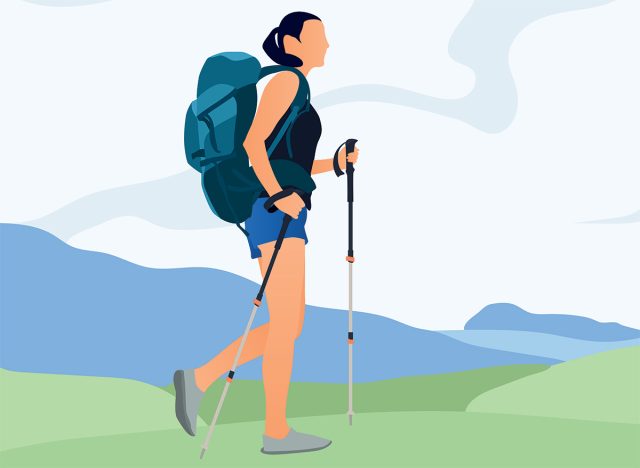
Instructions:
“Rucking” is simply walking while carrying a load on your back. You can begin with a well-fitting backpack into which you load a couple of books, or you can invest in a ruck sack or plate carrier which is specifically designed for rucking. Either will work to get started.
Simply put the pack on your back, be sure it fits snugly (if you use a backpack be sure it doesn’t sit too low on your lower back and choose one with a chest strap to keep the weight close to your body) and head out for a walk. Voila, you are rucking.
How often:
Begin rucking twice a week, starting with about a mile. When that feels good, add an additional day so you are rucking an average of three times a week. At that point, you can begin to add more weight and distance.
Why it works:
“Rucking” finds its roots in ancient military training. Despite its simplicity, it is incredibly effective for building strength, improving posture and torching calories. It is also incredibly easy to scale and to work into your life and has been shown to be an effective tool for weight loss.
Easier version for beginners:
Rucking is incredibly easy to scale. Start with a very light weight (perhaps 5 pounds) and a short distance. Build slowly over time as your body adjusts and gets stronger.
Common form mistakes to avoid:
- Do not add weight too quickly. Add just a few pounds at a time and note how your body feels in the day or two following your ruck walk. Feels great? Add an additional 2-5 lbs.
- Always be aware of your environment, keep your headphone volume low and stay aware of your surroundings.
- Maintain erect posture with shoulders over hips, chin parallel to the ground, and avoid the tendency to look down at your feet thereby rolling your shoulders forward or looking up at the sky thereby putting an arch in your lower back.
Gorilla Rows: Upper Body Strength Builder
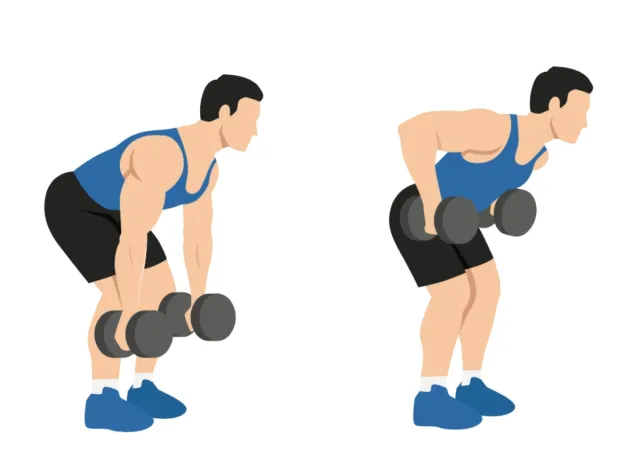
Instructions:
- Using two dumbbells, stand with your feet slightly wider than shoulder width.
- With the dumbbells on the ground, bend over at the hips, keeping your back flat. Grasp both dumbbells by the handles.
- Lift one dumbbell at a time from the ground to your side, below your armpit. Return the dumbbell to the ground and lift the other.
How often:
Perform a light warm up set, then three sets of 8-10 reps. Repeat twice a week.
Why it works:
This is another big-muscle move, engaging multiple muscle groups including back, arms and shoulders, while also engaging your core.
While you can’t spot reduce fat in your belly, you can increase the size of your shoulders and lats which will make your midsection smaller relative to your upper torso and give you a leaner look.
Easier version for beginners:
To make this move easier, place the dumbbells on a riser from about 6 to 12 inches off the floor. This will reduce tension on the low-back.
And, of course, begin with a lower weight or fewer reps and build from there.
Common form mistakes to avoid:
- Avoid twisting or rotating your torso as you pull the dumbbell to your side. Maintain a flat, stable back.
- Don’t lower the dumbbell too quickly. Return it to the floor in a controlled motion maintaining muscle activation.
- If you are new to working with dumbbells, working with weights may lead to “delayed onset muscle soreness” which may set in after a day or so. Do not let this derail your progress – products like Aspercreme can help to offset the soreness and enable you to keep moving.
Dead Bugs: Core Strengthener
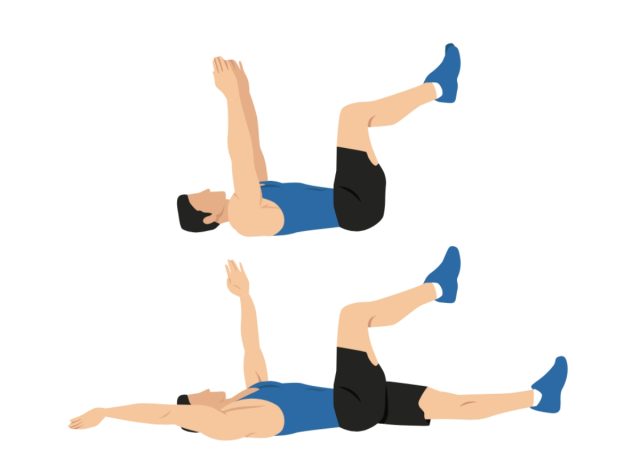
Instructions:
Lay on your back with your feet off the ground and knees bent. Lift your arms up perpendicular to your body, fingertips pointing to the sky. Simultaneously extend your right leg out towards the wall while you lower your left arm towards the floor. Return both to the starting position and repeat with the right arm and left leg.
How often:
Where you start depends on your fitness level. Build up to 3 sets of 10 repetitions each. Once that feels good, add repetitions until you can execute 20 perfect repetitions 3 times through.
Why it works:
Dead bugs strengthen your entire core, including abs, obliques and deeper stabilizing muscles.
As you tighten and strengthen your abs, it will give the appearance of a flatter stomach.
Easier version for beginners:
If moving both your arms and your legs simultaneously is too challenging to start, begin by keeping your arms on the ground and just extending your legs. As you get stronger (and you will) begin adding the oppositional arm movements.
Common form mistakes to avoid:
- Maintain a neutral spine – while you don’t need to push your lower back into the floor, don’t let it arch up either.
- The most common mistake people make is not moving arms and leg in opposition: it sometimes takes a moment to coordinate right arm and left leg. Go slow and take the time to coordinate this oppositional movement: as an added benefit, oppositional movements are really good for our brains.
Bird Dogs: Back and Core Stabilizer
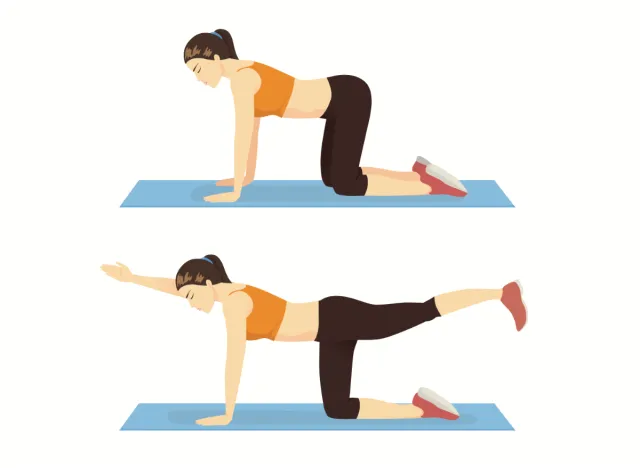
Instructions:
- Begin in the “tabletop” position on your knees with your hands securely planted on the floor right below your shoulders.
- With your core engaged, simultaneously extend your right arm out in front of you at the same time you extend your left leg – you are looking to create a straight line from your fingertips to your toes.
- Return both your leg and your arm to tabletop position and repeat with your other arm and other leg.
- Advanced version: rather than returning to tabletop between each movement, maintain your balance, bring your elbow to your knee, and complete 10 repetitions on the same side before moving to the other side.
How often:
Build up to 3 sets of 10 repetitions up to five times per week.
Why it works:
Bird dogs are fantastic for strengthening your entire midsection and core, including those all-important back muscles that enable you to maintain the erect posture that reduces the appearance of belly fat.
Easier version for beginners:
When you are first starting out, reduce the number of repetitions to as many as you can do while maintaining stability. If that number is less than one, then begin by separating the arm movement from the leg movement – do just the arms for 10 and then the legs.
Mistakes to avoid:
- When people first begin this move, they sometimes have a bit of difficulty coordinating their arm with the opposite leg. Be sure you start slowly to get that oppositional motion.
- Avoid any tendency to let your belly sink to the floor – engage your abs to maintain that strong, tabletop position.
- Avoid lifting your leg back and up to the sky. Your heel, back and arm should all be parallel to the floor.
Stair Walking: Accessible Cardio Anywhere
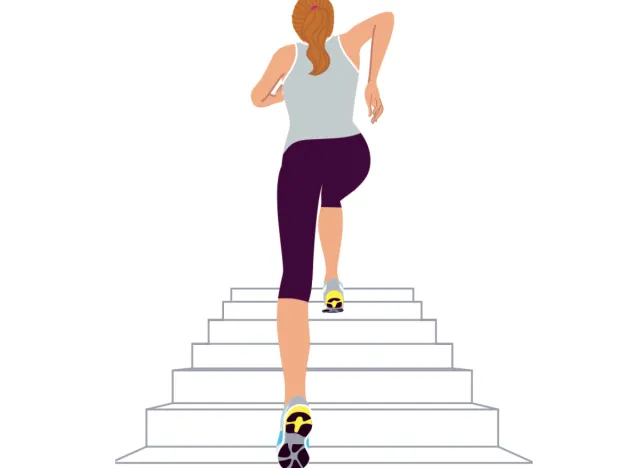
When my son was born and I often found myself trapped in the house as he napped, I discovered the power of stair walking and it has been part of my fitness routine ever since.
Instructions:
- Walk up a flight of stairs in a slow, focused and deliberate way, feeling your legs working with each step. Note that the slower you go, the harder you’ll work.
- Walk down the stairs, once again in a slow and controlled way.
- Remember: handrails are your friend: use them.
How often:
Take the stairs as often as possible.
Why it works:
Stairs not only burn a lot of calories, they engage our hip flexors, lower abs and challenge our core to maintain our posture.
Easier version for beginners:
If walking an entire flight of stairs is challenging, begin by standing at the bottom of the staircase and simply step up and down to that bottom step in sets of 10.
Mistakes to avoid:
- Handrails are your friend for safety. Use them.
- Be sure you put your entire foot on each step, not just the ball of your foot.
- As you climb up the stairs, be sure your knees remain aligned in a straight line – don’t let them cave in toward each other (similar to when you are executing a squat).
- Avoid the tendency to tilt your body forward, using the momentum of your upper body to help you get up the stairs – strive to maintain erect posture.
How to Fit These Quick Moves Into Your Day
As I always say, the perfect time to exercise is whatever time works best for you – it is more important that you get the movement in, then when that movement happens.
That said, since these are designed to be quick hit movements, incorporating them into your day at different times can be effective. And if pain or soreness slows you down, products that help target pain and relief, like Aspercreme’s odor-free creams and roll-ons, can help you stay on track so you can keep moving whenever works best for you.
The Critical Role of Nutrition
While it is far more complicated and every individual is different, for most people who don’t have particular metabolic issues, losing fat is a fairly simple equation of calories in and calories out. Accordingly, if the goal is fat reduction, nutrition is absolutely critical.
In fact, my favorite exercises for fat reduction are “plate pushaways” and “fork put downs.”
And, while there are many, many diets and styles of eating out there, I believe there are three universal truths:
- Most of us – especially those of us in our 40s and beyond – would benefit from eating more protein;
- Most of us would benefit from eating more fruits and vegetables; and
- Most of us would benefit from eating less processed food and less added sugar.
Realistic Expectations for Fat Reduction
Every single body is different and the results you can expect depend entirely on three things:
- Your unique physiology;
- The level of movement you can add to your weekly routine;
- Your nutrition.
Doing these exercises alone is unlikely to have any meaningful impact on fat reduction. However, a reader can expect to find the exercises easier after one month as their bodies acclimate to the new movement patterns and can expect to begin feeling noticeably stronger after three months. And what I see time and time again is that a body that is feeling stronger craves better fuel (and by fuel I mean nutrition) in a reinforcing, healthy cycle of improved wellness and reduced fat.
Finally, the appearance of fat in your mid section is reduced as you get stronger and stand taller.
Best Advice for Beginners Over 40
When you begin adding new, challenging movements to your daily routine, you can expect some minor aches and pains, and muscle soreness. Don’t let them derail your progress. Adjust as needed and, as long as you’ve been cleared by a doctor to continue. After all, age makes us interesting… its pain that makes us dull! And that is mission critical because, as I often say, we don’t stop moving because we get old, we get old because we stop moving.